Showing posts with label recipe. Show all posts

Pollo Montecristo

Thursday, August 26, 2010

<


I made the best recipe last night. It fit all my criteria for a great recipe: fast, easy and delicious! I know I've got a winner when Dean keeps saying over and over again "This is good...this is really good." Ha! And, an extra bonus, it is a low cal recipe from Self Magazine.


Ingredients
Chicken
1 Tablespoon plus 1 and 1/2 tsp olive oil
4 boneless, skinless chicken breasts
Herbes de Provence (a spice mixture you can find in the spice section of the grocery store)
Flour
3 cloves garlic, sliced
shallot, chopped (I subsitute a 1/4 of an onion)
1/4 cup dry white wine and of course, pour one for the chef!
1/4 cup chicken stock
Juice of 1/4 lemon
1 tablespoon butter

Spinach with Olive Oil and Lemon
12 oz fresh baby spinach
1 tablespoon olive oil
Juice of 1/4 lemon

Heat the oven to 375, slice the garlic and chop the onion. Heat the oil in a large ovenproof pan over medium heat. Season the chicken with salt, pepper and the herbes de Provence. Dust with flour and tap off the excess. The small amount of flour helps keep this recipe light!


Cook, meaty side down for 5 minutes. Turn over and cook for a minute more.


Add the garlic and onion and stir for 30 seconds. Add the wine and cook for 1 minute. Add chicken stock and cook 30 seconds, then add the lemon juice.


Now pop the pan into the oven for 10 minutes. When it's time to take it out, place the chicken on a cutting board and place the pan back on medium heat. Cook for 1 minute and add the pad of butter and stir.

To serve cut each breast into 3 pieces, transfer to a plate and serve with the sauce. The sauce turns out yummy and flavorful without being too rich or heavy.

For the spinach:

This was a different way to cook spinach for me but it came out nice. Simply add spinach to boiling water and cook for a minute. Drain and wring out. Toss with oil, salt and lemon juice.


Have fun!

Berry Filled Angel Cake

Wednesday, August 18, 2010

Over the years, this cake has been my absolute go-to in terms of dessert. It's Sie's favorite dessert I make (I admittedly don't make very many), and it's been a real hit each time I make it.

The history behind this cake is that my grandpa, grandma and aunt all have birthdays near or ON July 4th, so it's typically a pretty big family holiday for us. As a result, my mom and I are always on the lookout for great Independence day recipes. Years back, my mom went with this festive (red,white & blue) cake for Papa's birthday and sent me a clipping of the recipe she used (believe it or not, from the funny pages!)

That was probably sophomore year of college, fast forward to now; I've made this recipe over a dozen times and it always turns out delicious. In our house, it rarely survives more than 3 days! I've tried several different substitutions, like adding pudding to the filling and Kahlua to the icing among others. I never look at the recipe, and when I went to write this blog- I wondered if I still had the original recipe from mom. Sure enough, with nerdy notes to myself included:


The best thing about this recipe is that once you learn the basic method, you can alter it so many ways and change up the ingredients to accommodate your favorite fruits/etc. At the bottom I've listed some ideas I have (and now must try!) for different variations of this stuffed angel food cake.

For the basic recipe, you'll need FOUR ingredients:
- 1 store bought angel food cake (I noticed these now come in sugar free, which would be a great option for those watching their sugar)
- 16 oz. tub of whipped topping
- 1 lb. container of strawberries
- 1 pint of blueberries


Since tonight I wanted to kick it up a notch, I also bought coconut - what can I say I had a craving!


First, slice the top quarter off of your angel food cake. Do not worry if it's not a perfectly straight cut, you will eventually cover the entire cake in whipped cream and no one will be the wiser. :)


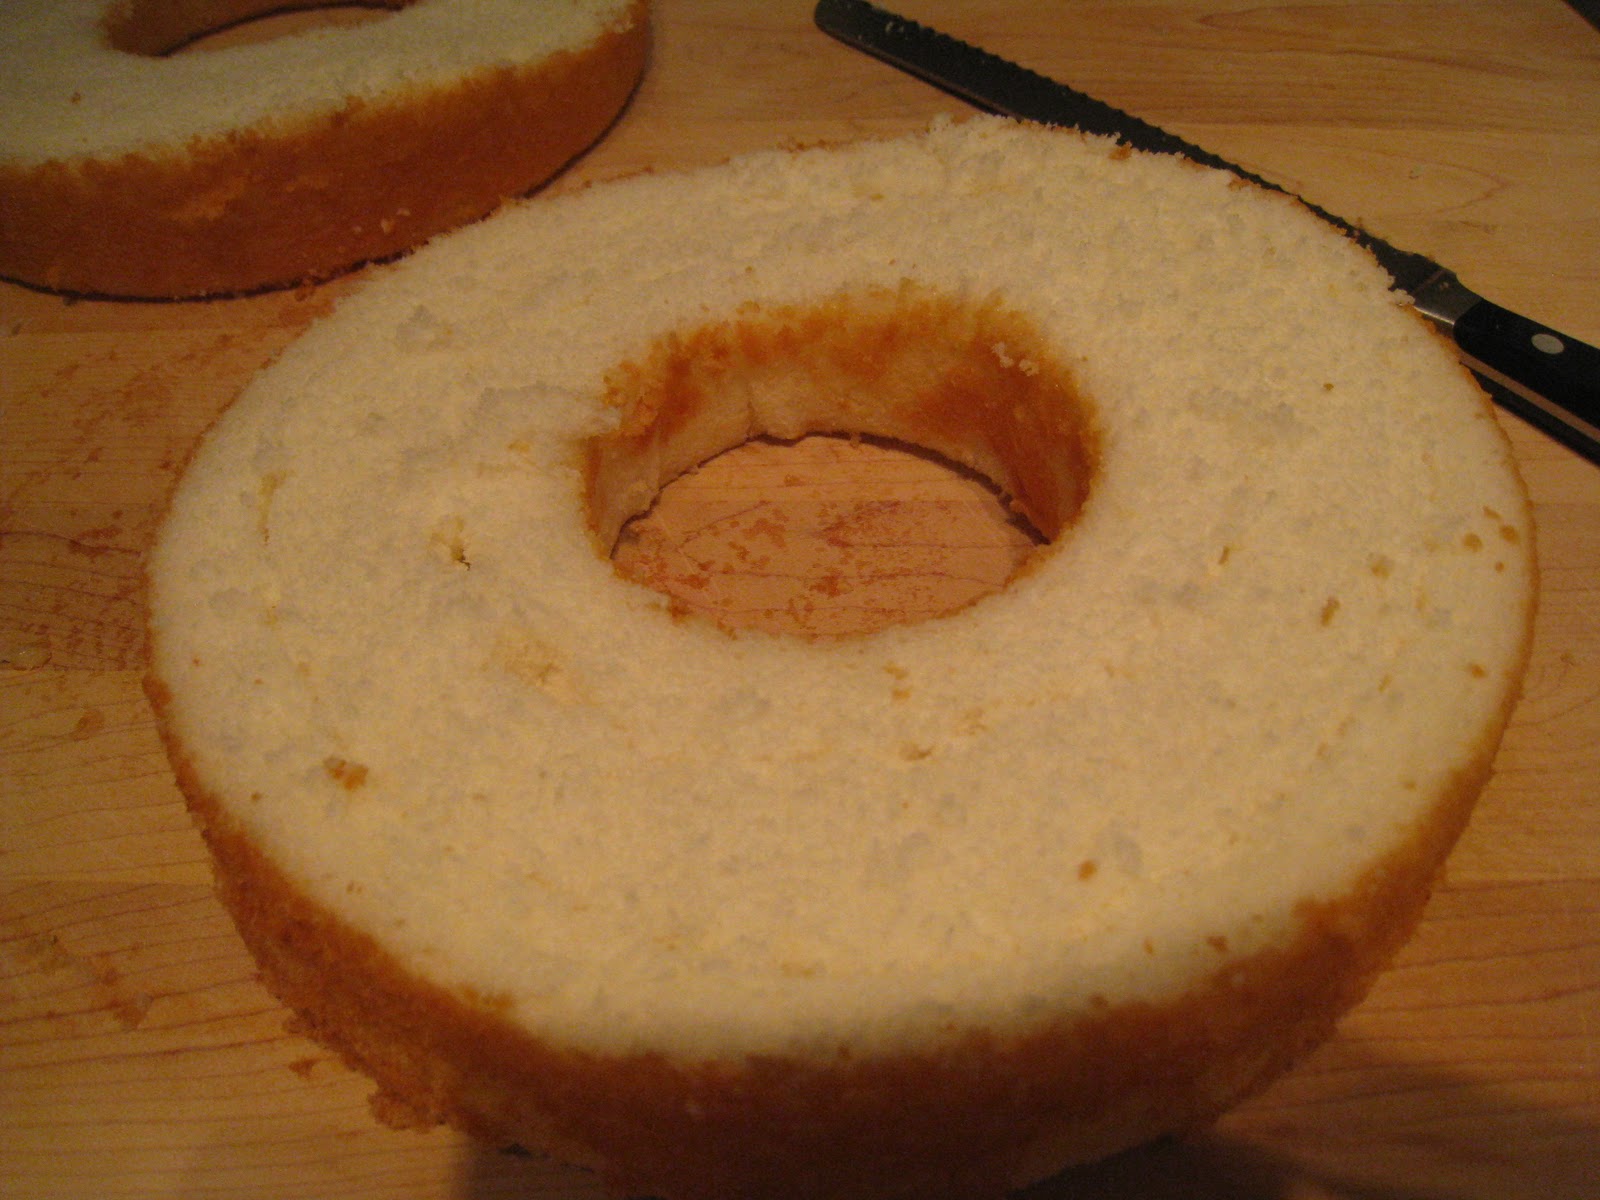
Cut 2 circular lines an inch a part on the bottom piece, so that you are then able to remove the cake between the lines (not quite all the way to the bottom, leave a thin layer on bottom)


Tear up the removed cake into bite size pieces and put in a bowl. To the bowl, add roughly 3/4 to 1 cup of chopped strawberries, 1/2 cup of blueberries, and 3/4 cup of of whipped cream. All of these ingredients are perfectly ok to eyeball! Since tonight I was spicing it up with coconut, I threw in a handful of coconut to this mix as well. Stir all ingredients together.
*Note: the original recipe says to add 1/4 tsp of vanilla extract to the mix as well- but it's definitely not make or break because I rarely remember this step. The cake has plenty of vanilla flavor on its own. :)


Place the bottom portion of cake (now hollowed out) on your serving plate. If you want to go all Martha (I did for the sake of the blog), lay several pieces of wax paper around the edges of the plate first so that when you are finished icing you can simply pull out the wax paper and "voila" = clean serving plate.

Now spoon your whipped cream-berry-cake mixture into the cavity of the cake. This step is exactly why its completely fine to eyeball this recipe: if you end up with more than you need of the delicious filling, I'm sure you'll find SOMETHING to do with it (aka get after it with a spoon!)


Place the top quarter back on top, try to match it up as best you can- but the whole thing will now be covered in whipped cream, so all mistakes will be forgiven. :)

"Ice" your cake with whipped cream, I usually use a plastic spatula, start from the top and work my way downwards. When the cake is well covered, I go around to make it even one last time.


Last, decorate with berries and strawberries. Since tonight I decided to add coconut, I basically "threw" handfuls of coconut all around the edges. Place cake in the fridge for about 2 hours (if you can hold your husband off for that long). Remove your wax paper, slice up, serve & enjoy!


This cake is great because it's light & relatively healthy as desserts go, but tastes delicious and has a pretty presentation. Also, it's just about as easy as can be and involves no actual baking! :) When I served Sie his first slice, he referred to it as his "warm-up" piece. Haha, I'm guessing the cake will be gone by Friday at the latest!

ideas for variations on this cake:
- use the strawberry angel food cakes that they have in the bakery now (yum!)
- mix up the fruit: add bananas to the mix. go tropical with pineapple and coconut. Raspberries and lemon zest would also make a great combo.
- add fruit preserves to the filling or make it an additional layer above and below the stuffing
- if you're a chocoholic- you could do chocolate whipped cream and add chocolate chips to the filling

Hope you enjoy this one as much as I do :)

Sangria Blanco

Tuesday, August 17, 2010

This is another recipe that Kate and I made for our beautiful friend's baby shower. It was easy and I must say delicious!

You will need:
1/4 cup sugar
1 1/4 cup water
2 bottles dry white wine
3/4 cup loosely packed mint leaves
1 cup orange liqueur (We used Cointreau)
2 to 3 cups lemon - lime soft drink
2 lemons thinly sliced
2 limes thinly sliced
2 oranges thinly sliced
1 pint strawberries thinly sliced


The first thing I did was thinly slice all the fruit, put them in baggies and place them in the freezer (except the strawberries). This was a "Martha" tip I read to keep your fruit looking nice.

Next, I mixed the sugar and water in a saucepan over medium heat and brought it to a boil. I stirred occasionally until all the sugar was dissolved, removed from the heat and let cool for 10 minutes. At this point, I added the Cointreau to the mixture and poured it into a large ziplock and placed it in the freezer. It doesn't freeze but it will stay nice and cold for traveling.

To take to the shower location, I packed a cooler with the sliced fruit baggies, the sugar-water-Cointreau baggy, sprigs of mint wrapped in wet paper towels, the chilled wine and the the chilled Sprite. So...the only thing I had to do once I got there...was to pour it all together in my dispenser.


For the Mommys-To-Be, we set out pitchers of water with the same fruit combination. We also set out ice...some needed ice for the Sangria because it is a little potent, but I liked it that way :)  A little more Sprite might be more to the liking of some people! Once again thanks to Southern Living for the recipe.

Have fun,

Cha Cha Chicken Salad

Monday, August 9, 2010

Saturday, Kate & I got to make one of our favorite recipes together. It was for a baby shower that we helped give for a dear friend. Kate had made this recipe once before and it was definitely a crowd pleaser. It's soooo easy yet delicious with a beautiful presentation - What's not to like!! Once again this recipe comes courtesy of Southern Living.


The chicken salad itself is easy to put together, especially if you use an already roasted chicken like we did! First, whisk together the softened cream cheese, mayo, curry powder and salt (we left the salt out because we used rotisserie chicken which can be salty itself).

Then, stir in the chicken, pineapple (with juice) and cranberries. That's it...that's the basic chicken salad and it's so good. Dean doesn't like fruit in his salad but he liked this. The crushed pineapple makes it moist but not overwhelmingly fruity.


The next steps are what make this salad a stand out. The final presentation looks difficult, but it really wasn't at all. Line an 8 inch cake pan with plastice wrap and spoon the chicken salad in (we doubled the recipe, so opted to use a round casserole dish for the added height). Chill overnight.


To display, put your cake stand upside-down on top of the chicken salad and turn it over and the salad will easily come out. Remove the plastic wrap (which will now be on top). This step was the most intimidating - but it comes out so easy.


Use your hands to pat the chopped almonds all around the sides (not on top)- similar to coconut on a cake. This step is messy, but once the sides are adequately covered, place the cake dish over the sink or on top of a cookie sheet, and simply wipe around the edge of the cake stand with a paper towel to remove the excess almonds.


Garnish with peaches, berries and various herbs and VOILA!


1 (8oz) package cream cheese, softened
1 cup mayonaise
2 teaspoons curry powder
1 teaspoon salt
6 cups chopped cooked chicken
1 (8oz) can crushed pineapple
2/3 cup orange-flavored sweetened dried cranberries
1 cup chopped roasted, salted almonds


To transport, Kate put 2 toothpicks on top and covered it with plastic wrap and it traveled like a dream.


Have fun,

Greek Chicken Burgers

Saturday, July 31, 2010

Yesterday I was searching for a quick & healthy recipe to try and came across this one (also from Southern Living) for "Greek Turkey Burgers". Being a lover of all things greek/mediterranean, I decided I'd try it out but change it up to ground chicken, which I prefer to ground turkey. I find it's just as easy to use, very inexpensive, slightly lower in calories and typically turns out more flavorful and juicy. Most groceries now carry ground chicken, you can find it right near the ground turkey in the meat section.

These burgers turned out really yummy - satisfying and flavorful, but not heavy. I would definitely make again and thought it could also work great as meatballs or made into a low carb meal with a salad in lieu of the bun.

I ran through the store on the way home- the ingredints list was short & I was on a mission, so I was in and out in no time. (also the trip cost less than $15!) I thought the buns may be a little carb heavy (we had just worked out!), so I was thinking I would try with pita, but then came across these whole grain "Sandwich Thins" which I had been wanting to try anyway.


First, I opted to use our mini-food processor to chop the ingredients in the burgers rather than finely chop by hand. This little baby is a God send. :) In addition to the red onion, I added about 10 medium black olives a little garlic and half a fresh jalepeno for some kick (I'm my mother's child).


In a big bowl, I added a generous portion of crumbled feta cheese (my favorite), lemon zest, salt & pepper.


I added the chopped veggies and the ground chicken. This is where your hands must get dirty. I've tried using a spoon or fork in the past, but nothing mixes the chicken burgers together better than your own two hands. I kind of like digging in, BUT if you are meat averse, a friend of mine shared a little kitchen trick. If you don't want to get your hands dirty but don't have gloves handy, use two ziploc bags or plastic bags on your hands and dig in.
Now it's burger time!


I used a grill plan because I know chicken burgers can be much more sticky (much less fat/grease), so I thought they would be much easier to flip in the pan. If you don't care about grill marks, these could also be made in a non stick saute pan just fine. I oiled the grill and got to forming the patties. This mix made 4 medium sized patties - I was in shock because I somehow always mess up and make 3 large & one teeny tiny baby one, but I got it right this time. :)


I got the four patties workin on the grill pan and got to work on the toppings and cucumber-yogurt sauce (tzatziki in Greek, mast-o-khiar in Persian!). Sie is Persian and since we've been married, he's really introduced me to lots of new foods, but my hands down favorite: cucumber-yogurt! This recipe was very simple (grated cucumber, chopped mint, salt and thick greek yogurt)- the flavors turned out well, but I have to be honest and say if possible - just go store bought! They now sell tzatziki near the hummus in the prepared food section or pick up a tub from any mediterranean store. It's not that the flavors weren't good - we really enjoyed it with the burgers. There's just something about how the ingredients have blended together longer and the yogurt is usually much thicker (the trick is to drain the cucumbers), that's hard to mimic at home. That's my 2 cents!


After about 5-7 minutes, I flipped the chicken patties once, they had gotten nice and golden brown with good grill marks. While cooking, I try not to mess with them too much or press down so they stay nice and juicy. On to toppings; I thinly sliced cucumber, red onion and tomato and got out a little arugula lettuce (any lettuce will do, I just love arugula). You could add in any toppings you like- red bell peppers, pepperoncini, green onions - would all work really well.


Once the chicken burgers were nice and browned on both sides (about 7 minutes on either side)- I turned off the heat, let sit for about a minute while I got things ready (and to let the meat settle). The easiest way to tell they are ready is by pressing down with your spatula: if the juices run clear - you're good to go. The patties should also feel nice and firm when you press down - unlike ground beef, you don't want any medium-rare chicken burgers!

To assemble, in order, I layered chicken, a generous helping of cucumber yogurt, tomatoes, onion, cucumber & arugula.


The final product:


In the end, these were some of the most flavorful chicken burgers I've made (has to be all that feta!!!) and the lemon zest really brought out all the flavors as well. The entire meal took less than 45 minutes and was delicious and easy!

Bonus: based on the Southern Living nutritional count, these had less than 300 calories per burger! We saved quite a few calories by switching to sandwich thins (only 100 calories) instead of traditional buns.

Hope you enjoy :)

Shrimp Pesto Pizza

Thursday, July 29, 2010

Last night I made a Southern Living recipe - Pesto Shrimp Pizza - it was wonderful and didn't take any time at all to make.

I stopped by the gym after work so time was of the essence. I knew I had a bag of frozen, peeled, pre-cooked shrimp so I ran through HEB and got a pre-made gourmet pizza crust (it was extremely thin and also was made with honey (??)


The actual recipe called for a pre-made pizza dough but I opted to cut that step out :) I also grabbed some light already made pesto.

If you've never made a pizza on the grill...they are fabulous. Who needs a fancy pizza oven! Dean heated the grill to 350 degrees and sprayed it with cooking spray. All things grilling come under Dean's domain.

While Dean fired up the grill, I chopped the onion and a jalapeno (the jalapeno is a subsitution because we like things spicey). I quickly sauteed the two adding salt and pepper. When they were soft and cooked through, I added that already cooked shrimp, stirred and took it off the fire.


To assemble, I put the pizza crust on a baking sheet, spread the pesto, decided to add a little spinach, spread the shrimp mixture and then covered it all with the parmesan cheese.


From there Dean placed it straight on the burners of his gas grill, covered it and let it cook for 4 minutes. He opened the grill and rotated it and cooked 2 or 3 minutes more and VOILA...thin, crispy, wonderful pizza. Who knew it was so easy!


Cooking Spray
chopped onion
red bell pepper (I subsituted jalapeno)
salt
pepper
2 tablespoons olive oil
1/3 cup pesto
1/2 cup Parmesan cheese
Spinach (why not add more veggies)
peeled cooked shrimp cut in half lengthwise
Have fun!


Becky


Made by Lena